2009-08-29

CrochetDad's Wheel Stitch Block Tutorial - Foundation Round


How to crochet a Wheel Stitch Block.


This block will be made in two colors.  I'm using Caron Worsted in One Pound skein using Lace (A) and Taupe (B) with a K crochet hook.  Crochet notations are U.S.
Foundation Rnd

Using A, let's start with a ring - pick your favorite method:
  • Method 1: ch 5 (counts as trc plus ch 1), [trc, ch 1] 11 times, in first ch, join to 4th ch with sl st, cut yarn, finish off.
  • Method 2: ch 4, join to first ch with sl st, ch 5 in ring (counts as trc plus ch 1), [trc, ch 1] 11 times in ring join to 4th ch of beginning ch 5 with sl st, cut yarn, finish off, weave in ends.
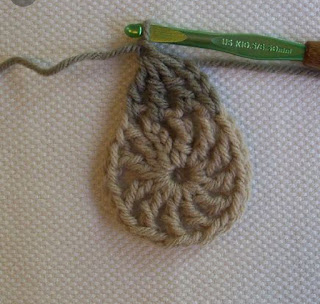
  • Method 3: (this is my favorite) Adjustable starting ring (a.k.a. Magic Ring) ch 5 in ring (counts as trc plus ch 1), [trc, ch 1] 11 times in ring, join to 4th ch of beginning ch 5 with sl st, cut yarn, finish off, weave in end.  Pull ring closed as tight as you like, weave in end of yarn.

Here's what mine looks like:


Note: When joining in the round, I use the method described in Sarah London's blog.  You can replace this method when I say "cut yarn and finish off" instead of the sl st method. 

CrochetDad's Wheel Stitch Block Tutorial - Second Round

Rnd 2: Join B in the top loops of any trc, ch 3:

 
trc cluster in next 3 ch 1 spaces

trc cluster = [trc in next ch 1 sp reserving last loop on hook] 3 times (4 loops on hook)


yo and pull through all loops on hook, ch 1 - trc cluster complete

Note: the ch 1 at the top of the cluster will be referred to as the shell anchor
 
ch 3, join with sl st in top loops of next trc.

CornerCluster complete

Recap:  CornerCluster = [ch 3, trc cluster over next 3 ch 1 sp, ch 3, join with sl st in next trc]

CornerCluster over next 3 ch 1 spaces


continue around ring in like manner, doing two more CornerClusters

Rnd 2 complete


CrochetDad's Wheel Stitch Block Tutorial - Third Round

Rnd 3: ch 1, [trc, ch 1] 8 times in next shell anchor, ( remember - the shell anchor is the ch 1 at the top of the trc cluster) join to next sl st of previous rnd with sl st.


CornerShell complete

Recap: CornerShell = ch 1, [trc, ch 1] 8 times in shell anchor
continue around doing CornerShell in each shell anchor

Rnd 3 complete - cut yarn, finish off and weave in ends 


CrochetDad's Wheel Stitch Block Tutorial - Fourth Round

Rnd 4: join A in top loops of the third trc of any CornerShell, ch 3 - beginning of CornerCluster 


complete CornerCluster 

trc cluster in next 6 ch 1 spaces - 7 loops on hook 


yo and pull through all loops on hook, ch 1 (side shell anchor), ch 3 join to next trc with sl st to complete SideCluster 
continue around, doing CornerCluster in corners and SideCluster in sides.

Rnd 4 complete 


CrochetDad's Wheel Stitch Block Tutorial - Fifth Round

Rnd 5: begin as in Rnd3 - CornerShell in corner shell anchor, ch 1, [trc, ch1] 5 times in next side shell anchor

SideShell complete 


continue with CornerShell in corner shell anchor and SideShell in side shell anchor

Rnd 5 complete. Cut yarn, finish off. Weave in ends.


Repeat Rnd 4 and Rnd 5 until desired size. 

CrochetDad's Wheel Stitch Block Tutorial - Ending Round

You can end with the previous round, or, if you prefer a more square finish - continue one more round...


Ending round: Using B Repeat Rnd 4 - CornerCluster in each corner shell anchor, SideCluster in each side shell anchor, join with sl st.


2009-08-24

Rectangular Wheel Stitch Afghan (progress)


Progress at 6 rounds: approximately 12 x 36 inches

I'm attempting to crochet an afghan in the round, but achieve a rectangular finished product. In my last post, the foundation round was twice as long as the length (approximately 2 x 4 inches). By the 5th round, the measurement was 8 x 10 inches, still 2 inches different between the width and the length. If I had continued to completion, the finished product would still have the short side 2 inches shorter than the long side. This is not what I had in mind.

A good online friend reminded me that in this type of project (working in the round), as you increase the rounds, the length grows at the same rate as the width, so if, at the beginning, the width is 2 inches shorter than the length, after x number of rounds, the width will still be 2 inches shorter than the length, which is not what I intended.


When working a project in the round, to insure the proper aspect ration, that is width to length, you have to know the desired measurements at the end of the project to enable you to start with the proper sized foundation round. Subtracting the width (short measurement) from the length (long measurement) will give you the proper size of the foundation round.

I sat on my couch with a measuring tape across my lap and decided I wanted the width of the afghan to be approximately 30 inches and the length to be approximately 60 inches, so subtracting the width from the length gave me 30 inches. I started with a foundation round of 30 inches. Since the width was only 2 inches, the start of the project looked more like a strip or scarf than an afghan. As you can see by the picture above, the piece is beginning to look more like I intended, with the current measurements approximately 12 x 36 inches.

OK! I know! The difference now is only 24 inches instead of 28 inches. But after 6 rounds it's starting to look more like what I wanted than the previous attempt.

My next post will have the instructions, and some more verbiage about how to start if your desired finished product isn't what I had in mind for my finished product.

2009-08-19

Wheel Stitch Afghan

·.¸¸.·´¯`·.¸><(((º> U P D A T E <º)))><¸¸.·´¯`·.¸.·

I'm working on an update to this after realizing that, since the width increases at the same speed as the length, you'll end up with almost a square if the piece gets anywhere near the size of a normal afghan. Of course, this might work well for a lapghan...

·.¸¸.·´¯`·.¸><(((º> U P D A T E <º)))><¸¸.·´¯`·.¸.·

I found a really nice-looking afghan online based on the wheel stitch, but the afghan was square. I made one in baby size for a present, which you can see in a previous post here.

In some cases, a square afghan or blanket is just what you need, but there are times you want a rectangular one, right?. I liked the wheel stitch, so I decided to write out a pattern for a rectangular afghan using this stitch. I haven't completed the afghan yet, but I will share my progress as it goes along.

Here's what I've come up with so far with some pictures to help you along the way:

Wheel Stitch Afghan
© 2009 Gene Saunders, a.k.a. CrochetDad
Do not redistribute without permission. You may post a link to this article, but don't copy it and call it your own. Thanks!

For yarn, I'm using Red Heart Super Saver in several colors (actually, I'm starting with the left-over yarn from the Baby Blanket I made. The colors are six shades of blue, white, buff and burgundy. You can make this afghan with as little as one color - I'll tell you later how to use only one color without cutting the yarn...

Hook size will depend on the yarn you use and how tight or loose you want the stitches to look.

Notes:

  • The afghan is worked in rounds, don't turn unless instructed.
  • The finished size is up to you - just keep going until it's the right size
  • Instructions are in US crochet terms
  • These are not instructions on how to crochet
  • It is assumed you have basic crochet knowledge
Abbreviations:

ch = chain
sl st = slip stitch
trc = treble crochet
bptrc = back post treble crochet

Afghan:

Rnd 1: This is the foundation round - ch 12, 7 trc in 4th ch from hook, sk 4 ch, sl st in next ch
, sk 4 ch,15 trc shell in next ch, sl st in same st as last sl st, 7 trc in same st as first 7 trc shell, sl st in last ch (top of first shell, finish off.

Note: If you're doing a single color version, don't finish off - just keep going

You should have something like this:


Rnd 2: This round is the first half of the wheel stitch. It takes two rounds to complete the stitch.

(Note: If you are doing this in one color, sl st in next 3 sts, then continue with the next ch 3)

Change color, join yarn in top of first trc, ch 3, [yo twice, bptrc in next st, reserving last loop on hook] 4 times, (5 loops on hook) yo and pull through all loops, ch 1 (CornerCluster made). The ch 1 will be referred to later as the “shell anchor” later. Here's what you should have:


Now ch 3, and sl st under loops of current st and next st, like this:


ch 3,
[yo twice, bptrc in next st, reserving last loop on hook] 6 times, yo and pull through all loops on hook, ch 1 (SideCluster made) (again, the ch 1 is the "shell anchor" for the next round). Here's what mine looks like at this point:


Now do a ch 3,
CornerCluster, ch 3, sl st as before under the loops of the current and next st, ch 3, another SideCluster, ch 3, sl st as before, ch 3, CornerCluster, ch 3, join with a sl st to those two loops as before and you should have something like this at the end of Rnd 2:


Rnd 3:

This is the second half of the Wheel Stitch and you'll be staying with the same color as round 2.

10 bptrc in shell anchor (remember, it's the anchor stitch of the previous round's
CornerCluster), sl st in next st (CornerShell made).


6 bptrc in shell next shell anchor (SideShell made). Continue around doing CornerShell in the shell anchor in the corners and SideShell in the shell anchor along the side.
..

..
Continue by repeating Rnd 2 and Rnd 3 with color changes on even rounds.

Beginning of Rnd 4:


SideCluster on Rnd 4:


Completed Rnd 4:


Completed Rnd 5:


Here's what I have so far:


When I get further along, I'll show you how I do the border (we'll end with an even round).

If you're having trouble, please post your comment and I'll try to help.

2009-08-18

Wheel Stitch Blanket (a.k.a. Wooleater)

I recently finished this baby-sized (34 inches) blanket for a relative. The stitch is called the wheel stitch, and I've had some nice comments about it. I'm showing the front and back for comparison of the appearance of the stitch. Interesting.

Here's the front:


And here's the back:


The pictures were taken on different days, hence the difference in contrast/brightness.

I made the blanket after becoming interested in the pattern instructions online, which are no longer available. This one's square, but I'm working on a rectangular version. I'll share the results of that soon.


Update:  The instructions for this blanket have been moved and published in a more clear manner.  New Wool Eater Instructions

2009-08-07

Shades of Blue Baby Round Ripple

Baby-sized Round Ripple in 4 shades of blue with off-white/gold/green center.

Caron Simply Soft yarn, L (8 mm) crochet hook


The pattern for this afghan is available for free at my Lulu Store:

    lulu.com/crochetdad